上一篇主要说了5种注入JS脚本的方式和常用的功能,这一篇说一下不同注入方式之间的通信以及一些有用的小技巧。
通信
上一篇说的5种JS之间的通信方法,可以用一张图来表示。
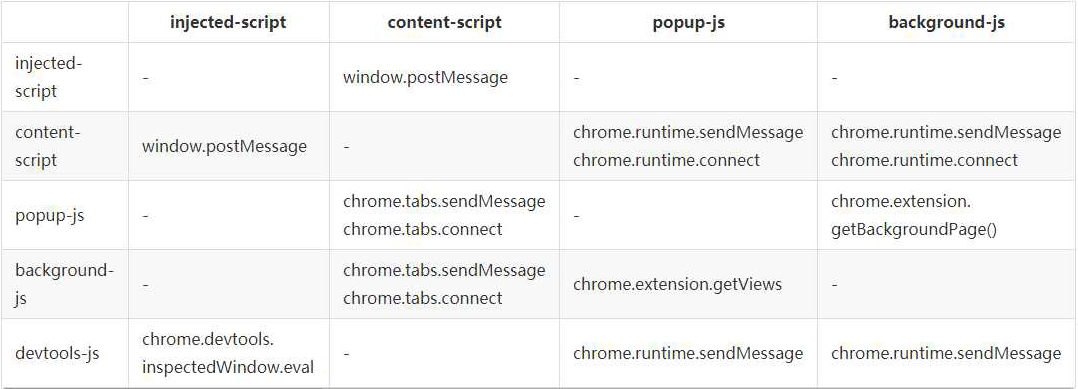
其中,popup和background其实几乎可以视为一种东西,因为它们可访问的API都一样、通信机制一样、都可以跨域。
popup和background
popup可以直接调用background中的JS方法,也可以直接访问background的DOM:
// background.js
function test()
{
    alert('我是background!');
}

// popup.js
var bg = chrome.extension.getBackgroundPage();
bg.test(); // 访问bg的函数
alert(bg.document.body.innerHTML); // 访问bg的DOM
至于background访问popup如下(前提是popup已经打开):
var views = chrome.extension.getViews({type:'popup'});
if(views.length > 0) {
    console.log(views[0].location.href);
}
popup或者bg向content主动发送消息
background.js或者popup.js:
function sendMessageToContentScript(message, callback)
{
    chrome.tabs.query({active: true, currentWindow: true}, function(tabs)
    {
        chrome.tabs.sendMessage(tabs[0].id, message, function(response)
        {
            if(callback) callback(response);
        });
    });
}
sendMessageToContentScript({cmd:'test', value:'你好,我是popup!'}, function(response)
{
    console.log('来自content的回复:'+response);
});
content-script.js接收:
chrome.runtime.onMessage.addListener(function(request, sender, sendResponse)
{
    // console.log(sender.tab ?"from a content script:" + sender.tab.url :"from the extension");
    if(request.cmd == 'test') alert(request.value);
    sendResponse('我收到了你的消息!');
});
双方通信可以直接发送JSON对象,所以无需解析,很方便(当然也可以直接发送字符串)。
content-script主动发消息给后台
content-script.js:
chrome.runtime.sendMessage({greeting: '你好,我是content-script呀,我主动发消息给后台!'}, function(response) {
    console.log('收到来自后台的回复:' + response);
});
background.js 或者 popup.js:
// 监听来自content-script的消息
chrome.runtime.onMessage.addListener(function(request, sender, sendResponse)
{
    console.log('收到来自content-script的消息:');
    console.log(request, sender, sendResponse);
    sendResponse('我是后台,我已收到你的消息:' + JSON.stringify(request));
});
注意事项:
- content_scripts向popup主动发消息的前提是popup必须打开!否则需要利用background作中转;
- 如果background和popup同时监听,那么它们都可以同时收到消息,但是只有一个可以sendResponse,一个先发送了,那么另外一个再发送就无效;
injected script和content-script
content-script和页面内的脚本(injected-script自然也属于页面内的脚本)之间唯一共享的东西就是页面的DOM元素,有2种方法可以实现二者通讯:
- 可以通过window.postMessage和window.addEventListener来实现二者消息通讯;
- 通过自定义DOM事件来实现;
第一种方法(推荐):
injected-script中:
window.postMessage({"test": '你好!'}, '*');
content script中:
window.addEventListener("message", function(e)
{
    console.log(e.data);
}, false);
第二种方法:
injected-script中:
var customEvent = document.createEvent('Event');
customEvent.initEvent('myCustomEvent', true, true);
function fireCustomEvent(data) {
    hiddenDiv = document.getElementById('myCustomEventDiv');
    hiddenDiv.innerText = data
    hiddenDiv.dispatchEvent(customEvent);
}
fireCustomEvent('你好,我是普通JS!');
content-script.js中:
var hiddenDiv = document.getElementById('myCustomEventDiv');
if(!hiddenDiv) {
    hiddenDiv = document.createElement('div');
    hiddenDiv.style.display = 'none';
    document.body.appendChild(hiddenDiv);
}
hiddenDiv.addEventListener('myCustomEvent', function() {
    var eventData = document.getElementById('myCustomEventDiv').innerText;
    console.log('收到自定义事件消息:' + eventData);
});
injected-script与popup通信
injected-script无法直接和popup通信,必须借助content-script作为中间人。
长连接和短连接
Chrome插件中有2种通信方式,一个是短连接(chrome.tabs.sendMessage和chrome.runtime.sendMessage),一个是长连接(chrome.tabs.connect和chrome.runtime.connect)。
短连接的话就是挤牙膏一样,我发送一下,你收到了再回复一下,如果对方不回复,你只能重新发,而长连接类似WebSocket会一直建立连接,双方可以随时互发消息。
短连接上面已经有代码示例了,这里只讲一下长连接。
popup.js:
getCurrentTabId((tabId) => {
    var port = chrome.tabs.connect(tabId, {name: 'test-connect'});
    port.postMessage({question: '你是谁啊?'});
    port.onMessage.addListener(function(msg) {
        alert('收到消息:'+msg.answer);
        if(msg.answer && msg.answer.startsWith('我是'))
        {
            port.postMessage({question: '哦,原来是你啊!'});
        }
    });
});
content-script.js:
// 监听长连接
chrome.runtime.onConnect.addListener(function(port) {
    console.log(port);
    if(port.name == 'test-connect') {
        port.onMessage.addListener(function(msg) {
            console.log('收到长连接消息:', msg);
            if(msg.question == '你是谁啊?') port.postMessage({answer: '我是你爸!'});
        });
    }
});
动态注入或执行JS
虽然在background和popup中无法直接访问页面DOM,但是可以通过chrome.tabs.executeScript来执行脚本,从而实现访问web页面的DOM(注意,这种方式也不能直接访问页面JS)。
示例manifest.json配置:
{
    "name": "动态JS注入演示",
    ...
    "permissions": [
        "tabs", "http://*/*", "https://*/*"
    ],
    ...
}
JS:
// 动态执行JS代码
chrome.tabs.executeScript(tabId, {code: 'document.body.style.backgroundColor="red"'});
// 动态执行JS文件
chrome.tabs.executeScript(tabId, {file: 'some-script.js'});
动态注入CSS
示例manifest.json配置:
{
    "name": "动态CSS注入演示",
    ...
    "permissions": [
        "tabs", "http://*/*", "https://*/*"
    ],
    ...
}
JS代码:
// 动态执行CSS代码,TODO,这里有待验证
chrome.tabs.insertCSS(tabId, {code: 'xxx'});
// 动态执行CSS文件
chrome.tabs.insertCSS(tabId, {file: 'some-style.css'});
获取当前窗口ID
chrome.windows.getCurrent(function(currentWindow)
{
    console.log('当前窗口ID:' + currentWindow.id);
});
获取当前标签页ID
一般有2种方法:
// 获取当前选项卡ID
function getCurrentTabId(callback)
{
    chrome.tabs.query({active: true, currentWindow: true}, function(tabs)
    {
        if(callback) callback(tabs.length ? tabs[0].id: null);
    });
}
获取当前选项卡id的另一种方法,大部分时候都类似,只有少部分时候会不一样(例如当窗口最小化时)
// 获取当前选项卡ID
function getCurrentTabId2()
{
    chrome.windows.getCurrent(function(currentWindow)
    {
        chrome.tabs.query({active: true, windowId: currentWindow.id}, function(tabs)
        {
            if(callback) callback(tabs.length ? tabs[0].id: null);
        });
    });
}
本地存储
本地存储建议用chrome.storage而不是普通的localStorage,区别有好几点,个人认为最重要的2点区别是:
- chrome.storage是针对插件全局的,即使你在background中保存的数据,在content-script也能获取到;
- chrome.storage.sync可以跟随当前登录用户自动同步,这台电脑修改的设置会自动同步到其它电脑,很方便,如果没有登录或者未联网则先保存到本地,等登录了再同步至网络;
需要声明storage权限,有chrome.storage.sync和chrome.storage.local2种方式可供选择,使用示例如下:
// 读取数据,第一个参数是指定要读取的key以及设置默认值
chrome.storage.sync.get({color: 'red', age: 18}, function(items) {
    console.log(items.color, items.age);
});
// 保存数据
chrome.storage.sync.set({color: 'blue'}, function() {
    console.log('保存成功!');
});
webRequest
通过webRequest系列API可以对HTTP请求进行任性地修改、定制,下面是webRequest的几个生命周期:
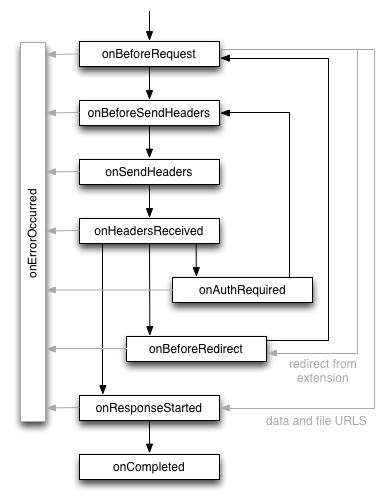
这里通过beforeRequest来简单演示一下它的冰山一角:
//manifest.json
{
    // 权限申请
    "permissions":
    [
        "webRequest", // web请求
        "webRequestBlocking", // 阻塞式web请求
        "storage", // 插件本地存储
        "http://*/*", // 可以通过executeScript或者insertCSS访问的网站
        "https://*/*" // 可以通过executeScript或者insertCSS访问的网站
    ],
}

// background.js
// 是否显示图片
var showImage;
chrome.storage.sync.get({showImage: true}, function(items) {
    showImage = items.showImage;
});
// web请求监听,最后一个参数表示阻塞式,需单独声明权限:webRequestBlocking
chrome.webRequest.onBeforeRequest.addListener(details => {
    // cancel 表示取消本次请求
    if(!showImage && details.type == 'image') return {cancel: true};
    // 简单的音视频检测
    // 大部分网站视频的type并不是media,且视频做了防下载处理,所以这里仅仅是为了演示效果,无实际意义
    if(details.type == 'media') {
        chrome.notifications.create(null, {
            type: 'basic',
            iconUrl: 'img/icon.png',
            title: '检测到音视频',
            message: '音视频地址:' + details.url,
        });
    }
}, {urls: ["<all_urls>"]}, ["blocking"]);
几个可能经常用到的事件使用示例:
// 每次请求前触发,可以拿到 requestBody 数据,同时可以对本次请求作出干预修改
chrome.webRequest.onBeforeRequest.addListener(details => {
    console.log('onBeforeRequest', details);
}, {urls: ['<all_urls>']}, ['blocking', 'extraHeaders', 'requestBody']);

// 发送header之前触发,可以拿到请求headers,也可以添加、修改、删除headers
// 但使用有一定限制,一些特殊头部可能拿不到或者存在特殊情况,详见官网文档
chrome.webRequest.onBeforeSendHeaders.addListener(details => {
    console.log('onBeforeSendHeaders', details);
}, {urls: ['<all_urls>']}, ['blocking', 'extraHeaders', 'requestHeaders']);

// 开始响应触发,可以拿到服务端返回的headers
chrome.webRequest.onResponseStarted.addListener(details => {
    console.log('onResponseStarted', details);
}, {urls: ['<all_urls>']}, ['extraHeaders', 'responseHeaders']);

// 请求完成触发,能拿到的数据和onResponseStarted一样,注意无法拿到responseBody
chrome.webRequest.onCompleted.addListener(details => {
    console.log('onCompleted', details);
}, {urls: ['<all_urls>']}, ['extraHeaders', 'responseHeaders']);
上面示例中提到,使用webRequestAPI是无法拿到responseBody的,想要拿到的话只能采取一些变通方法,例如:
- 重写XmlHttpRequest和fetch,增加自定义拦截事件,缺点是实现方式可能有点脏,重写不好的话可能影响正常页面;
- devtools的chrome.devtools.network.onRequestFinishedAPI可以拿到返回的body,缺点是必须打开开发者面板;
- 使用chrome.debugger.sendCommand发送Network.getResponseBody命令来获取body内容,缺点也很明显,会有一个恼人的提示:
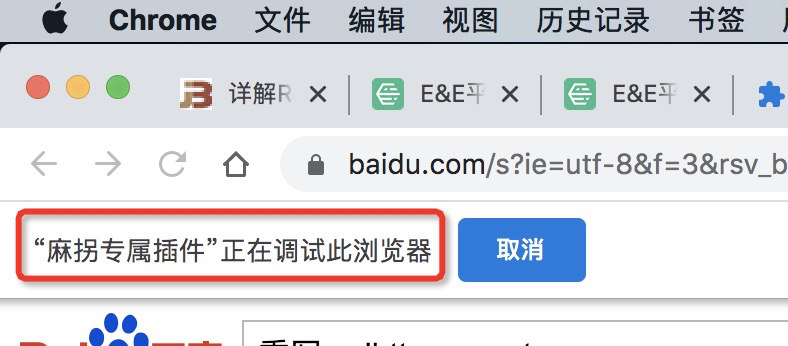
上述几种方法的实现方式可以参考这里。
国际化
插件根目录新建一个名为_locales的文件夹,再在下面新建一些语言的文件夹,如en、zh_CN、zh_TW,然后再在每个文件夹放入一个messages.json,同时必须在清单文件中设置default_locale。
_locales\en\messages.json内容:
{
    "pluginDesc": {"message": "A simple chrome extension demo"},
    "helloWorld": {"message": "Hello World!"}
}
_locales\zh_CN\messages.json内容:
{
    "pluginDesc": {"message": "一个简单的Chrome插件demo"},
    "helloWorld": {"message": "你好啊,世界!"}
}
在manifest.json和CSS文件中通过__MSG_messagename__引入,如:
{
    "description": "__MSG_pluginDesc__",
    // 默认语言
    "default_locale": "zh_CN",
}
JS中则直接chrome.i18n.getMessage(“helloWorld”)。
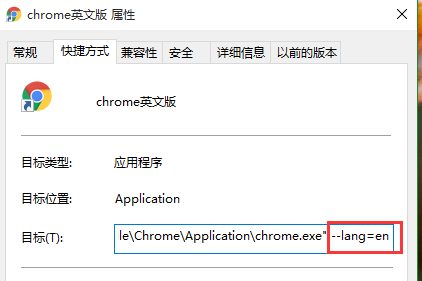
测试时,通过给chrome建立一个不同的快捷方式chrome.exe –lang=en来切换语言,如:
常见API总结
比较常用用的一些API系列:
- chrome.tabs
- chrome.webRequest
- chrome.window
- chrome.storage
- chrome.contextMenus
- chrome.devtools
- chrome.extension
chrome.cookies
获取某个网站的所有cookie:
const url = 'https://www.baidu.com';
chrome.cookies.getAll({url}, cookies => {
    console.log(cookies);
});
清除某个网站的某个cookie:
const url = 'https://www.baidu.com';
const cookieName = 'userName';
chrome.cookies.remove({url, name: cookieName}, details => {});
chrome.runtime
- chrome.runtime.id:获取插件id
- chrome.runtime.getURL(‘xxx.html’):获取xxx.html在插件中的地址
经验总结
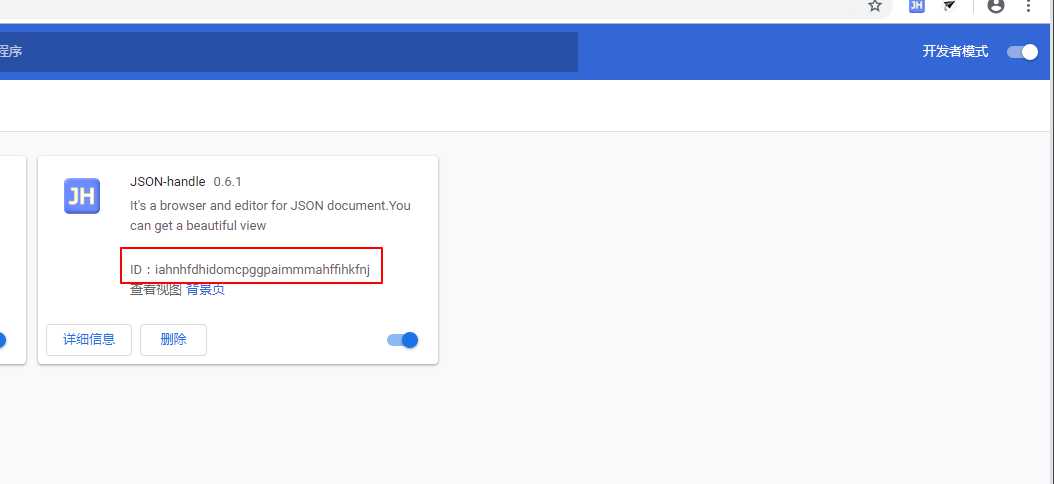
查看已安装插件路径
WIndows本地已安装的插件源码路径:C:\Users\用户名\AppData\Local\Google\Chrome\User Data\Default\Extensions,每一个插件被放在以插件ID为名的文件夹里面。
Mac系统本地已安装的插件源码路径:/Users/用户名/Library/Application Support/Google/Chrome/Default/Extensions 文件夹
如何查看某个插件的ID?进入 chrome://extensions ,然后勾选开发者模式即可看到了。
注意background的报错
很多时候发现自己写的代码会莫名其妙的失效,找来找去又找不到原因,这时打开background的控制台才发现原来某个地方写错了导致代码没生效,正是由于background报错的隐蔽性(需要主动打开对应的控制台才能看到错误),所以特别注意这点。
如何让popup页面不关闭
在对popup页面审查元素的时候popup会被强制打开无法关闭,只有控制台关闭了才可以关闭popup,原因很简单:如果popup关闭了控制台就没用了。这种方法在某些情况下很实用!
不支持内联JavaScript的执行
也就是不支持将js直接写在html中,比如:
<input id="btn" type="button" value="收藏" onclick="test()"/>
报错如下:
Refused to execute inline event handler because it violates the following Content Security Policy directive: "script-src 'self' blob: filesystem: chrome-extension-resource:". Either the 'unsafe-inline' keyword, a hash ('sha256-...'), or a nonce ('nonce-...') is required to enable inline execution.
解决方法就是用JS绑定事件:
$('#btn').on('click', function(){alert('测试')});
另外,对于A标签,这样写href=”javascript:;”然后用JS绑定事件虽然控制台会报错,但是不受影响,当然强迫症患者受不了的话只能写成href=”#”了。
如果这样写:
<a href="javascript:;" id="get_secret">请求secret</a>
报错如下:
Refused to execute JavaScript URL because it violates the following Content Security Policy directive: "script-src 'self' blob: filesystem: chrome-extension-resource:". Either the 'unsafe-inline' keyword, a hash ('sha256-...'), or a nonce ('nonce-...') is required to enable inline execution.
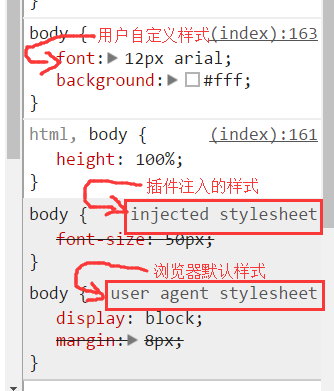
注入CSS的时候必须小心
由于通过content_scripts注入的CSS优先级非常高,几乎仅次于浏览器默认样式,稍不注意可能就会影响一些网站的展示效果,所以尽量不要写一些影响全局的样式。
官方文档资料
从来如此,便对吗?
《狂人日记》——鲁迅


评论
574232 185083Hello! I could have sworn Ive been to this web site before but following browsing through some with the post I realized it is new to me. Nonetheless, Im definitely happy I discovered it and Ill be book-marking and checking back frequently! 577811