前言
在前文中介绍了cubemap方式模仿环境反射,全景高动态环境图即HDRI贴图被广泛应用于游戏、动画、设计等各种领域,作为环境光源起到环境照明和环境反射的作用。
因此,高质量且适合的HDRI贴图素材往往能给三维场景的光影渲染起到锦上添花的作用,因此本文就介绍一下一些HDRI素材的资源网站以及在引擎中制作HDRI素材的方法。
资源网站
UE4中制作HDRI贴图
如果想要将UE4场景转换成一张HDRI贴图的话,可以如下操作,制作方法参考自Youtube上的以下视频。
首先在内容窗口创建一个Cube Render Target,可以命名为CubeRenderTarget。
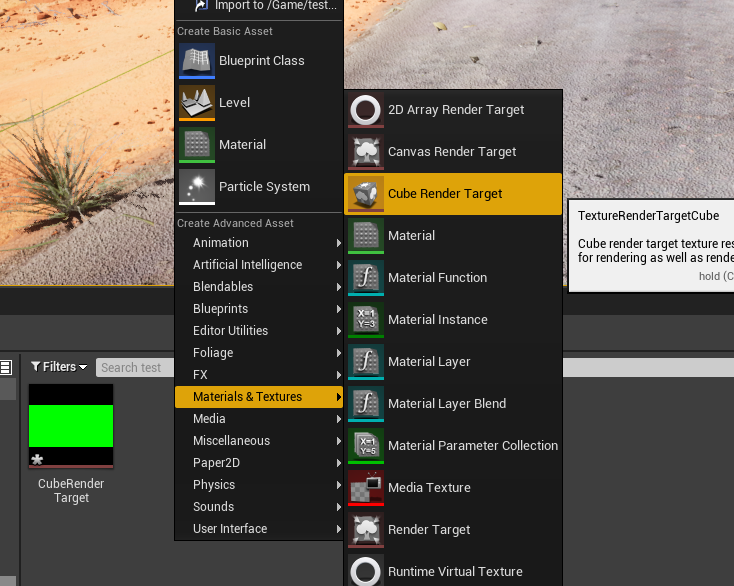
然后双击Cube Render Target打开属性窗口,修改贴图的尺寸

在场景中创建一个SceneCaptureCube,放置在适合作为HDRI贴图中心点的位置。
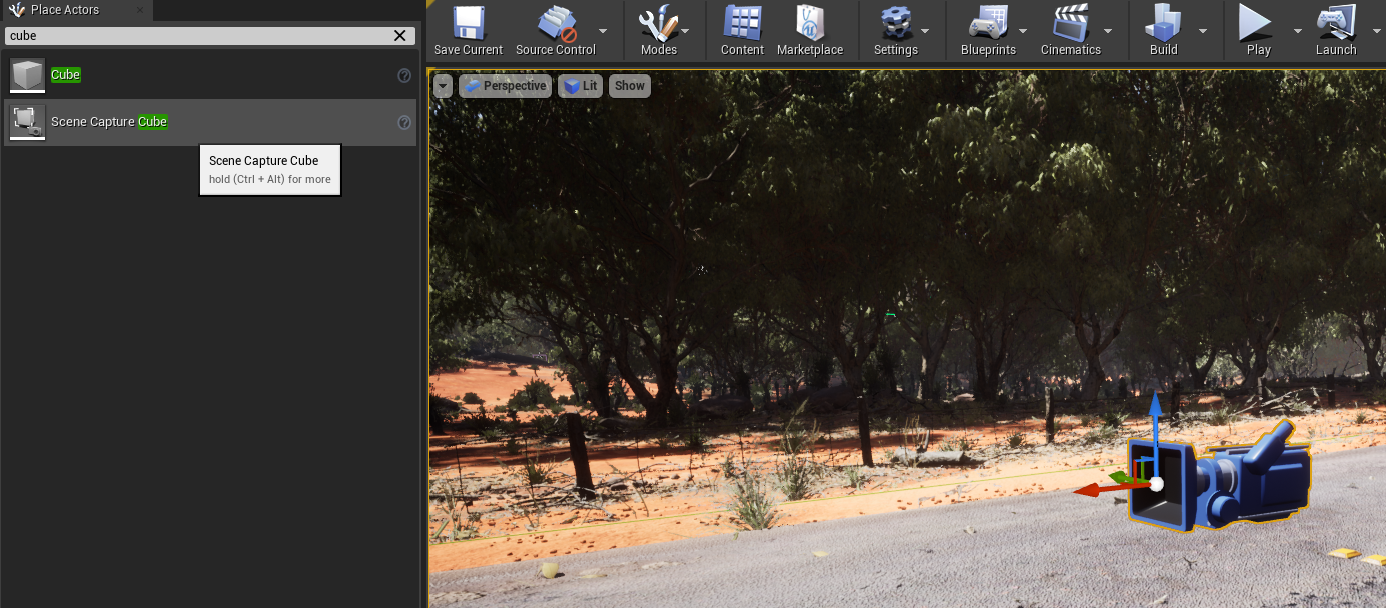
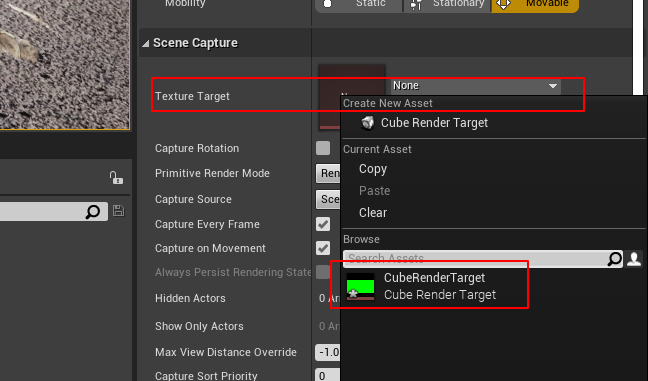
在SceneCaptureCube的Texture target属性中选择刚才创建的CubeRenderTarget。
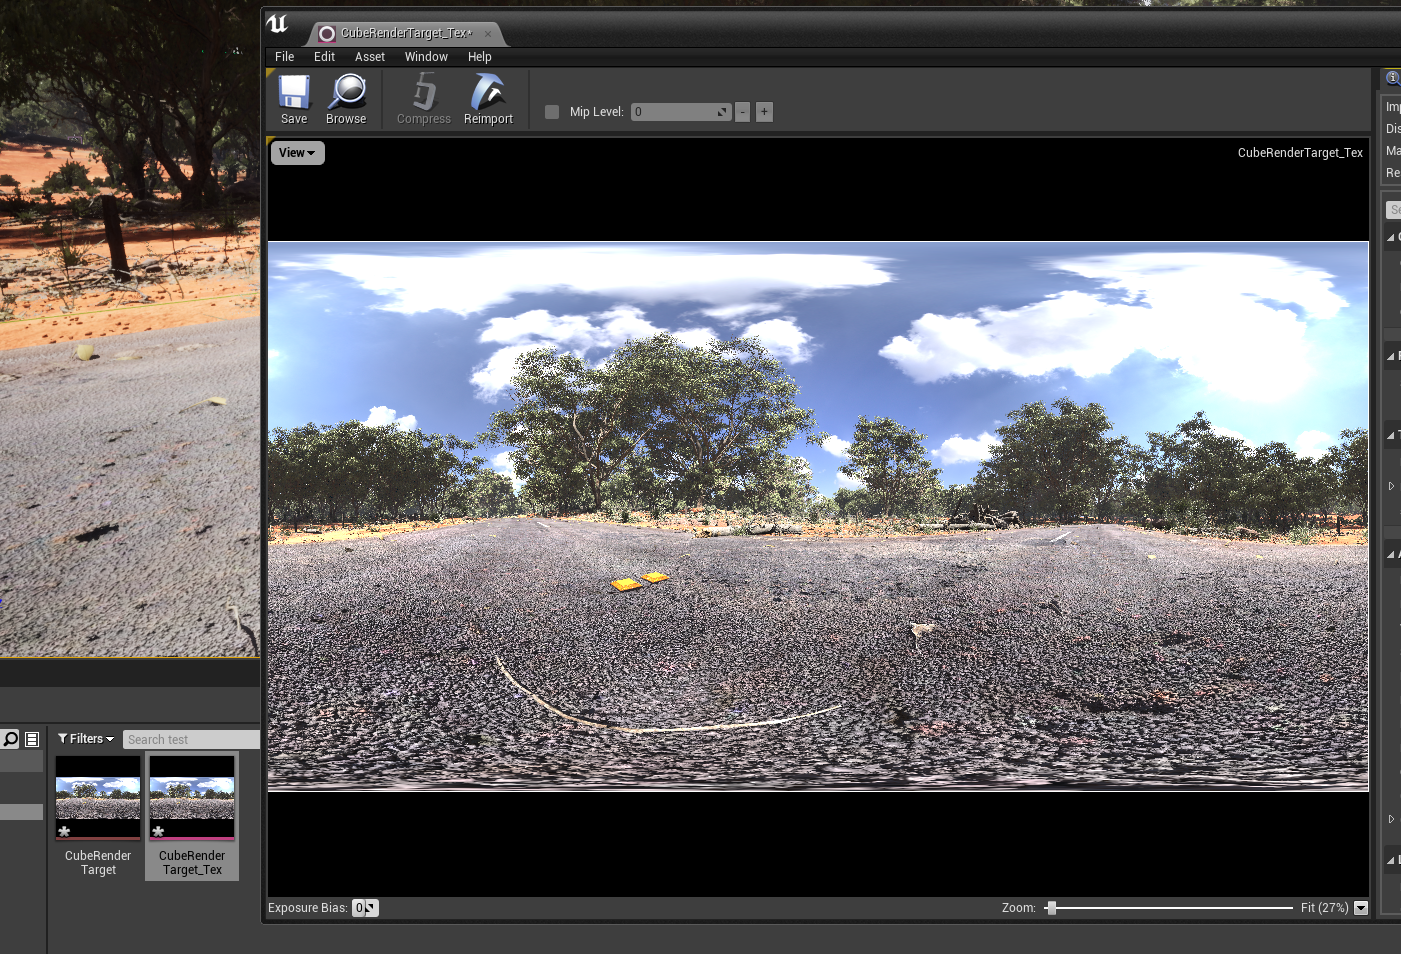
右键CubeRenderTarget选择创建静态图片,这样旁边就会生成一张HDRI贴图素材了。
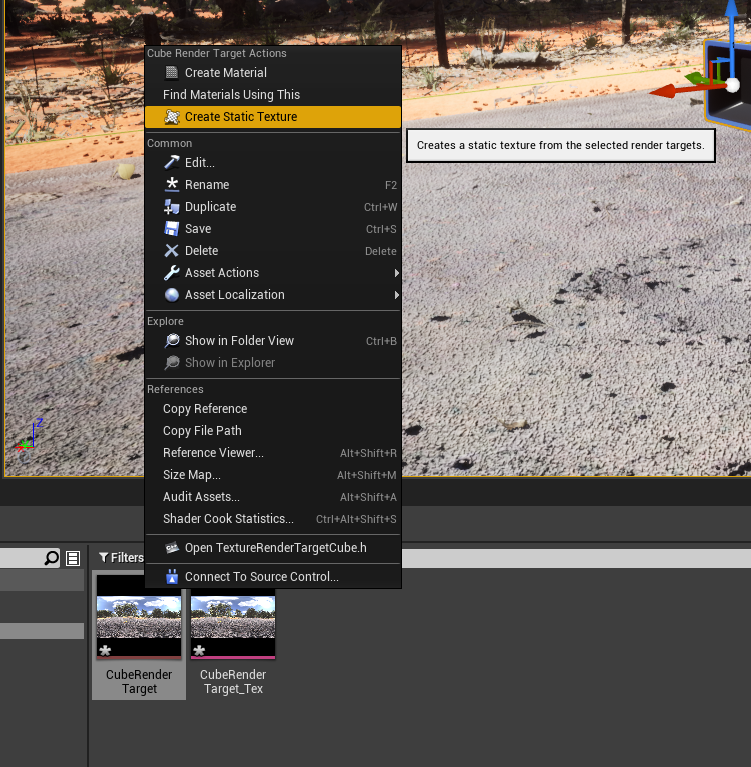
打开贴图看一下,效果还是很不错的。
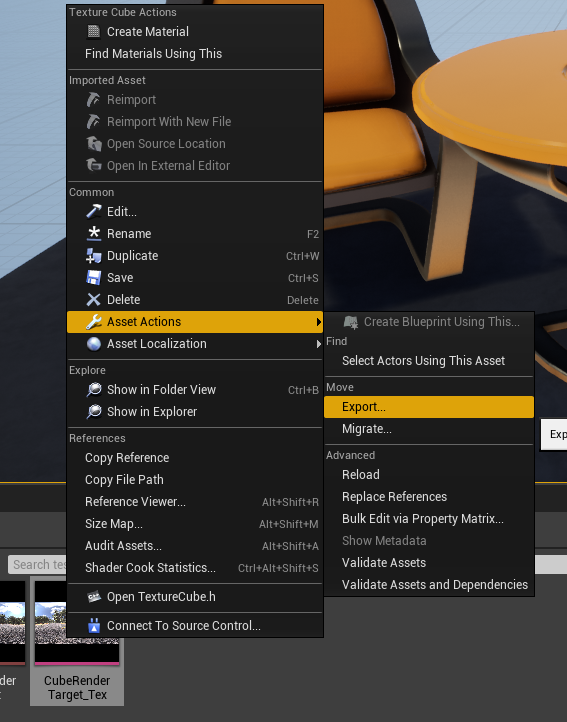
如果需要导出HDRI贴图,可以通过右键菜单-Asset Actions-Export命令导出。
Unity中制作HDRI贴图
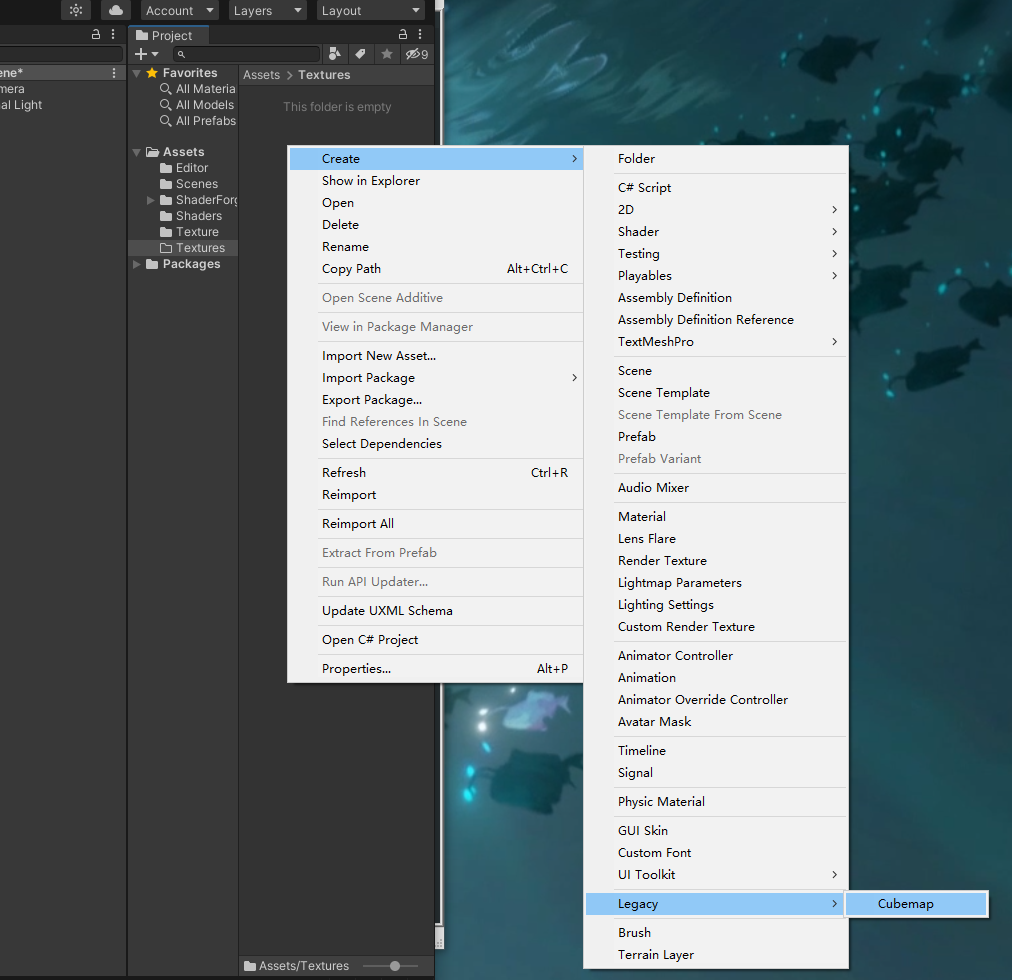
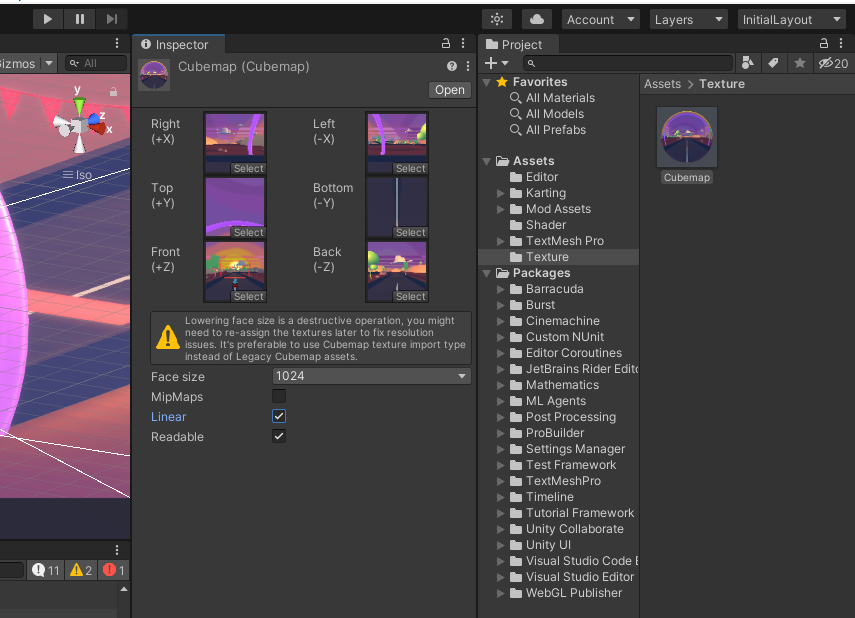
在Unity中可以通过C#脚本制作Cubemap,首先创建一个新的cubemap,取名为Cubemap。
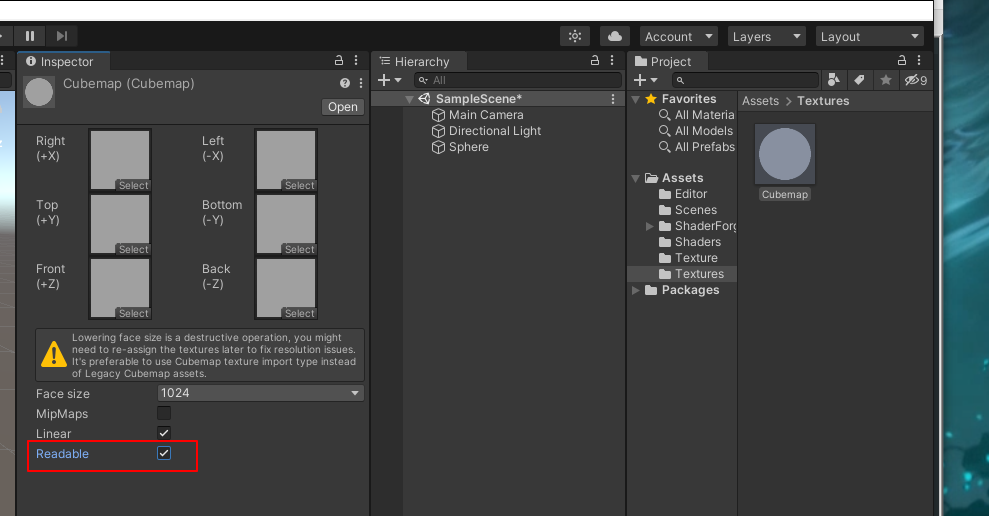
修改Cubemap的属性,更改Face size即单张图片的尺寸(Unity中创建的Cubemap是以六张图片的形式存储的),并一定要勾选最后面的Readable属性。
然后在工程目录中新建Editor文件夹,在Editor文件夹中新建一个C# Script脚本,取名为RendCubemap.cs。

使用Visual Studio或者文本编辑器打开新创建的C#脚本,删除里面内容后写入以下代码。
using System.Collections;
using System.Collections.Generic;
using UnityEngine;
using UnityEditor;

public class RenderCubeMap : ScriptableWizard
{
    public Transform renderTrans;
    public Cubemap cubemap;

    [MenuItem("Tools/CreateCubemap")]
    static void CreateCubemap()
    {
        //"Create Cubemap"是打开的窗口名,"Create"是按钮名,点击时调用OnWizardCreate()方法
        ScriptableWizard.DisplayWizard<RenderCubeMap>("Create Cubemap", "Create"); //打开向导
    }

    private void OnWizardUpdate() //打开向导或者在向导中更改了其他内容的时候调用
    {
        helpString = "选择渲染位置并且确定需要设置的cubemap";
        isValid = renderTrans != null && cubemap != null; //isValid为true的时候,“Create”按钮才能点击
    }

    private void OnWizardCreate() //点击创建按钮时调用
    {
        GameObject go = new GameObject();
        go.transform.position = renderTrans.position;
        Camera camera = go.AddComponent<Camera>();
        camera.RenderToCubemap(cubemap); //用户提供的Cubemap传递给RenderToCubemap函数,生成六张图片
        DestroyImmediate(go); //立即摧毁go
    }
}
保存C#脚本后,可以在Unity的Tools菜单中找到新增的Create Cubemap的命令(命令的名称是上面代码中设置的),点击命令后会出现详细设置窗口。
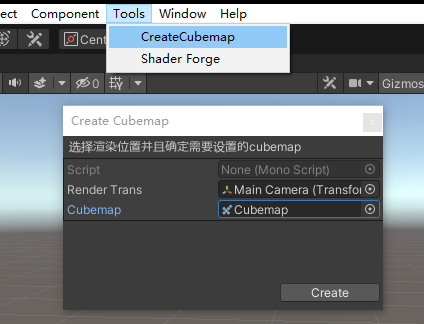
设置窗口中的Render Trans用于选择HDRI中心处的物体,Cubemap则选择刚才创建的Cubemap,设置完成后点击Create按钮,生成的HDRI贴图就会被写入到刚才创建的Cubemap中。
如果需要导出该HDRI贴图,可以通过以下C#脚本,脚本的创建过程跟前边一样就不重复了。
using UnityEngine;
using UnityEditor;
using System.IO;
using System.Collections;
using System.Collections.Generic;

public class CubeSplitter : EditorWindow
{
    Cubemap splitCube;
    Color[] CubeMapColors;
    int splitSize;

    [MenuItem ("Tools/CubeSplitter")]

    static void Init ()
    {
        CubeSplitter window = (CubeSplitter)EditorWindow.GetWindow (typeof (CubeSplitter), false);

        window.maxSize = new Vector2(512, 155);
        window.minSize = window.maxSize;
        window.title  = ("Cube Splitter!");
        window.Show();

    }


    void OnGUI ()
    {

        GUILayout.Label("Choose the Cube Map you want to save as 6 images and click EXPORT!", EditorStyles.boldLabel);
        splitCube = EditorGUILayout.ObjectField("My Cubemap:", splitCube, typeof(Cubemap), false) as Cubemap;
        GUILayout.Label("Make sure to set the Size to the same as the Cubemap you are using", EditorStyles.boldLabel);
        splitSize = EditorGUILayout.IntField("CubeMap Size: ", splitSize);

        if(GUILayout.Button("EXPORT!"))
        {
            if(splitCube)
            {
                Export();
            }

            if(!splitCube)
            {
                Debug.Log ("Forget Something?");
            }
        }
    }

    void Export()
    {
        var filePath = AssetDatabase.GetAssetPath(splitCube);

        Texture2D tex = new Texture2D (splitSize, splitSize, TextureFormat.RGB24, false);
        CubeMapColors = splitCube.GetPixels(CubemapFace.PositiveY);
        tex.SetPixels(CubeMapColors, 0);

        tex.Apply ();

        byte[] bytes = tex.EncodeToPNG();
        File.WriteAllBytes(filePath + "_Bot.png", bytes);

        CubeMapColors = splitCube.GetPixels(CubemapFace.NegativeY);
        tex.SetPixels(CubeMapColors, 0);

        tex.Apply ();

        bytes = tex.EncodeToPNG();
        File.WriteAllBytes(filePath + "_Top.png", bytes);


        CubeMapColors = splitCube.GetPixels(CubemapFace.PositiveX);
        tex.SetPixels(CubeMapColors, 0);

        tex.Apply ();

        bytes = tex.EncodeToPNG();
        File.WriteAllBytes(filePath + "_Lef.png", bytes);


        CubeMapColors = splitCube.GetPixels(CubemapFace.NegativeX);
        tex.SetPixels(CubeMapColors, 0);

        tex.Apply ();

        bytes = tex.EncodeToPNG();
        File.WriteAllBytes(filePath + "_Rig.png", bytes);

        CubeMapColors = splitCube.GetPixels(CubemapFace.PositiveZ);
        tex.SetPixels(CubeMapColors, 0);

        tex.Apply ();

        bytes = tex.EncodeToPNG();
        File.WriteAllBytes(filePath + "_Fro.png", bytes);

        CubeMapColors = splitCube.GetPixels(CubemapFace.NegativeZ);
        tex.SetPixels(CubeMapColors, 0);

        tex.Apply ();

        bytes = tex.EncodeToPNG();
        File.WriteAllBytes(filePath + "_Bak.png", bytes);

        this.Close();
    }

}
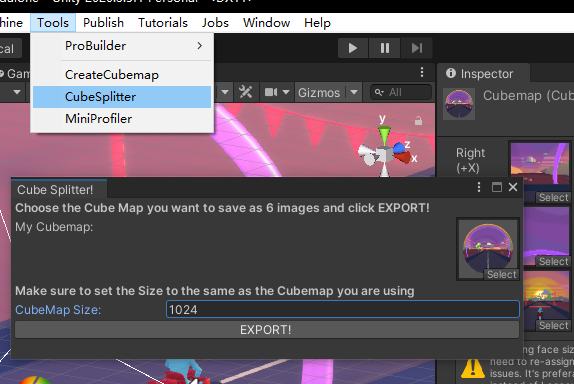
执行脚本命令后,在弹出的窗口中设置好要导出的Cubemap以及图片的尺寸,点击EXPORT按钮,就可以导出六张贴图。
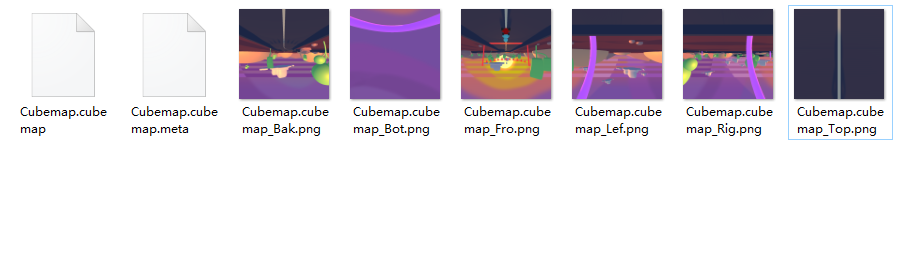
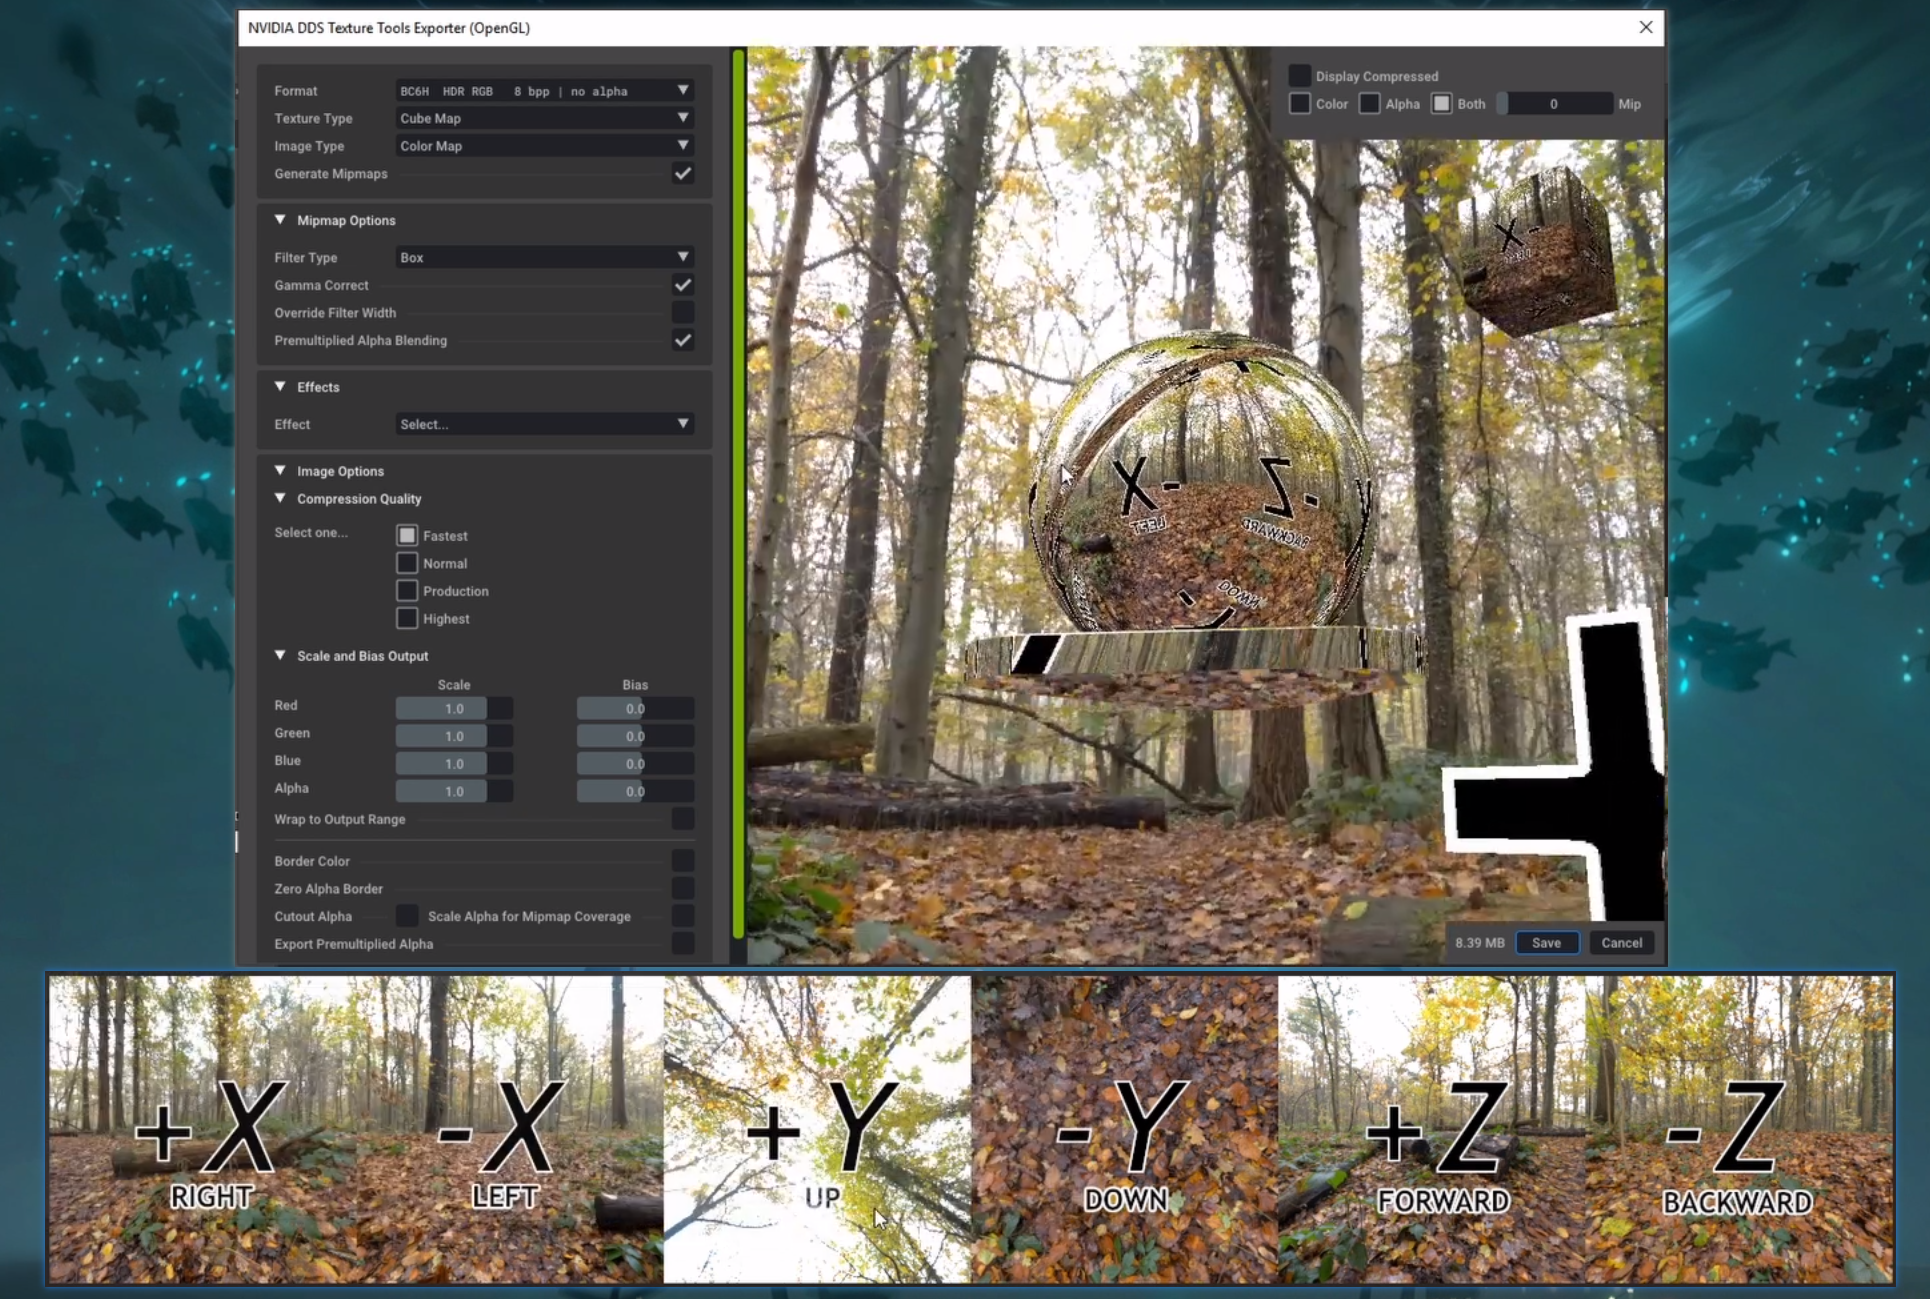
可以通过nvidia-texture-tools-exporter工具把六张贴图合并成一张完整的HDRI,使用方法可参考下图。
当然,Unity这个创建导出过程是比较麻烦的,所以还是建议有条件的直接上钞能力。
你最可爱,
我说时来不及思索,
但思索之后,还是这样说。
——普希金


评论
18652 351680Hey! Do you know if they make any plugins to protect against hackers? Im kinda paranoid about losing everything Ive worked hard on. Any recommendations? 399880
942431 207215Hello! Great stuff, please keep us posted when you post once more something like that! 992199
167360 336525Will you care and attention essentially write-up most of the following in my webpage in essence your site mention of this weblog? 959753